Setting up an AI agent on a Raspberry Pi has a lot of moving parts. Because it involves networking, permissions, and background workers, it’s easy for one small typo to break the whole system.
To make this easy, think of PopeBot as having two sides:
- The Chat (The Receptionist): This runs on your Raspberry Pi. It handles your messages and responds to you in real-time.
- The Agent (The Worker): When you ask the bot to actually write code or modify files, it sends that heavy lifting to a secure, isolated “room” (a Docker container via GitHub).
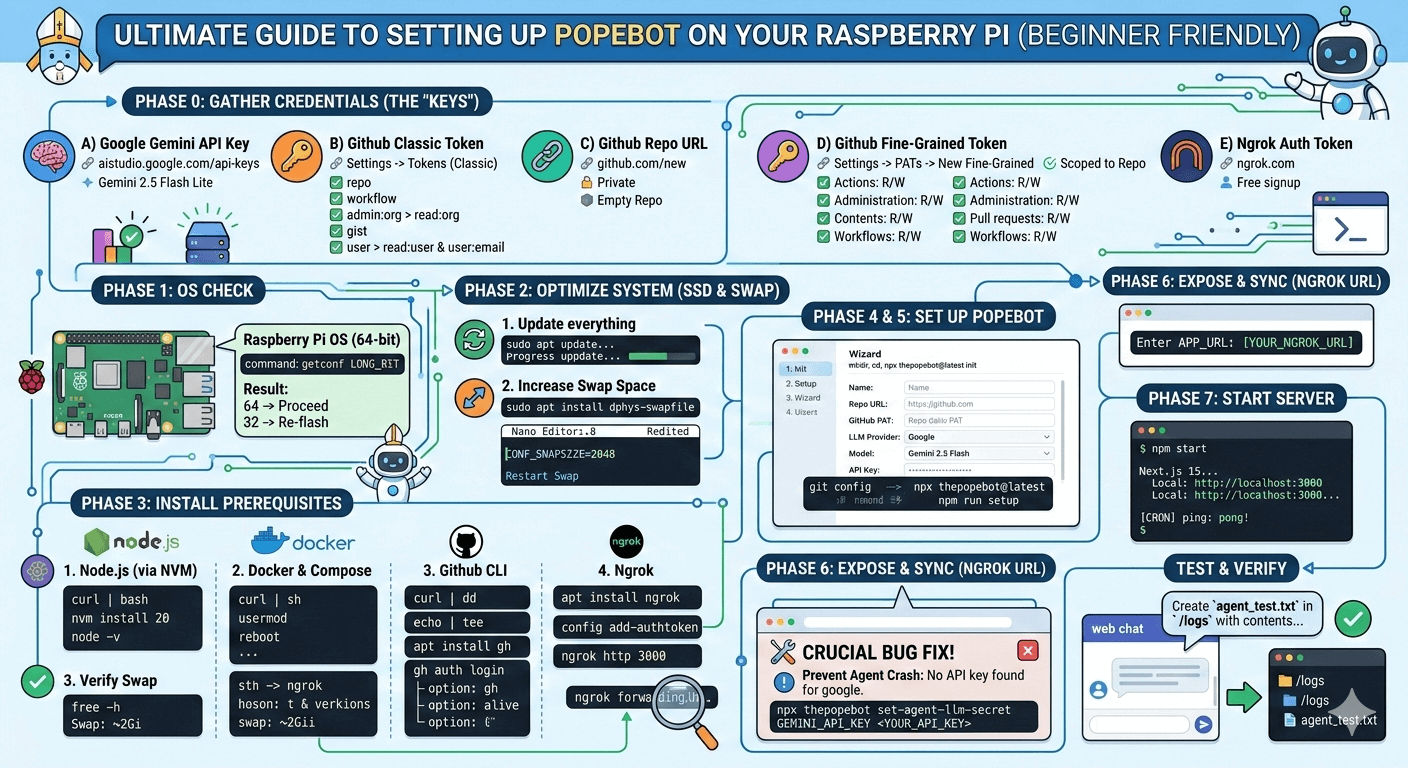
Phase 0: Gathering Your “Keys” (Credentials)
Before touching the Raspberry Pi, we need to generate four specific digital keys. I highly recommend opening a blank text document on your computer to paste these into temporarily. Do not share these keys with anyone.
A) Google Gemini API Key (The Bot’s Brain)
We will use Google’s Gemini 2.5 Flash. It is extremely fast and generous for free users.
- Go to Google AI Studio API Keys and sign in.
- Click Create API Key.
- Copy the key and paste it into your temporary text document. Label it
GOOGLE_API_KEY.
B) GitHub “Classic” Token (For Terminal Login)
Your Raspberry Pi needs permission to talk to your GitHub account.
- Go to your GitHub Tokens (Classic) Settings.
- Click Generate new token -> Generate new token (classic).
- Note: Type
Popebot Pi4 Terminal. - Expiration: Select Custom and set it to 365 days.
- The Skeptic’s Checklist: Check exactly these boxes (no more, no less):
- repo (check the top-level box to select all)
- workflow (crucial for running automated tasks)
- admin:org -> check read:org only
- gist (allows saving logs)
- user -> check read:user and user:email
- Scroll down, click Generate token, and copy it immediately. Label it
GITHUB_CLASSIC_TOKEN.
C) Create an Empty GitHub Repository
This is where your bot will store its code and do its work.
- Go to github.com/new.
- Repository Name: Type
keaibot(or whatever you prefer). - Privacy: Select Private.
- CRITICAL: Do NOT check “Add a README file,” “Add .gitignore,” or “Choose a license.” The repository must be 100% empty.
- Click Create repository.
- Copy the URL at the top of the next page (it looks like
https://github.com/yourusername/keaibot.git). Label thisREPO_URL.
D) GitHub “Fine-Grained” Token (The Vault Key)
The first GitHub token was for your terminal. This second token is strictly for the bot to manage the keaibot repository we just made.
- Go to GitHub Fine-Grained Tokens.
- Token Name:
Popebot-Worker-Key. - Expiration: 90 days or 1 year.
- Repository Access (CRITICAL): Select Only select repositories, then choose your
keaibotrepo from the dropdown. - Permissions: Expand “Repository permissions” and set exactly these:
- Actions: Read and write
- Administration: Read and write
- Contents: Read and write
- Pull requests: Read and write
- Workflows: Read and write
- (Metadata will automatically set to Read-only)
- Click Generate token and copy it. Label it
GITHUB_FINE_GRAINED_TOKEN.
E) Ngrok Account (The Tunnel)
Because your Raspberry Pi is sitting behind your home Wi-Fi router, the outside internet (like GitHub) cannot see it. Ngrok creates a secure tunnel directly to your Pi.
- Sign up for a free account at ngrok.com.
- On your dashboard, look for Your Authtoken and copy it. Label it
NGROK_TOKEN.
Phase 1: Verifying Your Pi’s Operating System
AI tools require memory. If your Pi is running a 32-bit operating system, it can only use 4GB of RAM, even if you bought an 8GB model. Let’s verify this.
-
Open your Raspberry Pi terminal.
-
Type this command and press Enter:
getconf LONG_BIT
- If it says
64: Perfect. Keep going. - If it says
32: Stop. You must reinstall your Raspberry Pi OS using the 64-bit version via the official Raspberry Pi Imager.
Phase 2: System Optimization (Preventing Crashes)
When AI agents work, they use a lot of RAM. If they run out, your Pi will freeze. We will create “Swap” space, which borrows a small part of your SSD to act as emergency RAM.
-
Update your Pi (type this and hit enter, wait for it to finish):
sudo apt update && sudo apt full-upgrade -y -
Install the Swap tool:
sudo apt install dphys-swapfile -y -
Edit the Swap configuration:
sudo nano /etc/dphys-swapfile- How to use Nano (the text editor): Use your arrow keys to find the line that says
CONF_SWAPSIZE=100. - Change the
100to2048(this equals 2GB). - Press Ctrl + O then Enter to save. Press Ctrl + X to exit.
- How to use Nano (the text editor): Use your arrow keys to find the line that says
-
Restart the Swap system to apply changes:
sudo systemctl stop dphys-swapfile
sudo systemctl start dphys-swapfile
To double-check it worked, type free -h. You should see roughly 2.0Gi next to the Swap: row.
Phase 3: Installing the Required Software
We need four tools: Node.js (runs the app), Docker (runs isolated tasks), GitHub CLI (manages repo setup), and Ngrok (the network tunnel).
1. Node.js
Copy and paste this exactly:
curl -o- https://raw.githubusercontent.com/nvm-sh/nvm/v0.39.7/install.sh | bash
source ~/.bashrc
nvm install 20
Verify it worked by typing node -v. It should reply with v20....
2. Docker
Docker takes a few minutes to install.
curl -sSL https://get.docker.com | sh
sudo usermod -aG docker $USER
CRITICAL: You must reboot your Pi right now for Docker permissions to apply.
sudo rebootLog back in when it turns on. After reboot, IP address might change
hostname -Ilog
192.168.0.166 172.17.0.1 3. GitHub CLI
Copy and paste this block to install the GitHub tool:
type -p curl >/dev/null || (sudo apt update && sudo apt install curl -y)
curl -fsSL https://cli.github.com/packages/githubcli-archive-keyring.gpg | sudo dd of=/usr/share/keyrings/githubcli-archive-keyring.gpg
sudo chmod go+r /usr/share/keyrings/githubcli-archive-keyring.gpg
echo "deb [arch=$(dpkg --print-architecture) signed-by=/usr/share/keyrings/githubcli-archive-keyring.gpg] https://cli.github.com/packages stable main" | sudo tee /etc/apt/sources.list.d/github-cli.list > /dev/null
sudo apt update && sudo apt install gh -y
Now, log in by typing:
gh auth login- Use your arrow keys to select GitHub.com -> HTTPS -> Yes.
- Choose Paste an authentication token.
- Paste the
GITHUB_CLASSIC_TOKENyou saved in Phase 0.
4. Ngrok
Open a second terminal window (keep the first one open for later).
curl -s https://ngrok-agent.s3.amazonaws.com/ngrok.asc | sudo tee /etc/apt/trusted.gpg.d/ngrok.asc >/dev/null && echo "deb https://ngrok-agent.s3.amazonaws.com buster main" | sudo tee /etc/apt/sources.list.d/ngrok.list && sudo apt update && sudo apt install ngrokLink your account using the token you saved in Phase 0:
ngrok config add-authtoken PASTE_YOUR_NGROK_TOKEN_HEREStart the tunnel:
ngrok http 3000Look at the screen. You will see a line that says Forwarding followed by a web address (e.g., https://random-words.ngrok-free.dev). Copy this address. Note: Leave this terminal window open and running. If you close it, your bot goes offline.
Once the bot is working, you can get a “Static Domain” for free from the ngrok dashboard so your URL never changes. Refer Network: Securing a “Forever Address”. For now, let’s just get you online.
Phase 4: Installing and Configuring PopeBot
Go back to your first terminal window.
-
Create a folder and initialize the bot:
mkdir keaibot && cd keaibot
npx thepopebot@latest init
(Press ‘y’ if it asks to install the package).
-
Tell Git who you are (prevents error messages later):
git config --global user.email "your.email@example.com" git config --global user.name "Your Name" -
Start the Setup Wizard:
npm run setup
How to answer the wizard:
- Project name:
keaibot - Open browser to create repo? Choose
No(we already did this!). - Paste HTTPS URL: Paste your
REPO_URL. - Paste GitHub PAT: Paste your
GITHUB_FINE_GRAINED_TOKEN. - LLM Provider: Select
Gemini (Google). - Which model: Select
Gemini 2.5 Flash. - Paste Google API Key: Paste your
GOOGLE_API_KEY. - Different LLM settings for agent jobs: Choose
No. - App URL: Paste the
https://...address you got from Ngrok in Phase 3.
The wizard will now build the website. This might take 2-3 minutes.
Phase 5: Start the Bot and Test
Start your bot server:
npm start Once it says Ready, go to your computer or phone browser and paste your Ngrok URL (https://your-url.ngrok-free.dev). You should see your bot’s chat interface!
Phase 6: The Final Test
To prove everything is wired up perfectly, type this message into your bot’s web chat UI:
Create a new file named `agent_test.txt` in the `/logs` directory of the repository.
The file should contain the text 'Hello from the autonomous agent!'.
If the bot successfully thinks about it, dispatches a job, and comes back saying it’s done, you can go check your keaibot repository on GitHub. If that text file is there, congratulations! Your AI agent is fully autonomous and functional.
Phase 7: Proactively Fixing the API Bug
If you noted an issue where the background agent crashes with Error: No API key found for google.
The Root Cause: The pi-coding-agent container is crashing because it isn’t receiving the correct API key for the Google provider.
Your container is most likely receiving GOOGLE_API_KEY. However, the pi-coding-agent (which relies on standard Google AI SDKs) almost certainly expects the environment variable to be named GEMINI_API_KEY when running the gemini-2.5-flash model.
While still in the keaibot folder in your terminal, run this command:
npx thepopebot set-agent-llm-secret GEMINI_API_KEY <YOUR_API_KEY> When it prompts you, paste your GEMINI_API_KEY, which is also the GOOGLE_API_KEY again. This permanently solves the crash issue.
Expert Tips for the Pi 4B
- Heat Management: Running Docker and LLM processes will make the Pi 4B hot. Ensure you have a heatsink or fan; otherwise, the Pi will “throttle” (slow down) to protect itself.
- The “Headless” Trap: If you are running this without a monitor (via SSH), use
screenortmuxso the bot keeps running after you close your terminal window. - Setup Failure If
npm run setupfails on Docker, check if your user is truly in the docker group by typinggroups. If you don’t seedockerin the list, the bot can’t start the agent.