For a long time, I used AI like everyone else: as a disposable, high-speed search engine. I’d upload a PDF, ask a few questions, get an answer, and close the tab. The context vanished. The next time I had a question, I had to start from scratch. It drove me crazy.
I didn’t want a chatbot; I wanted a persistent intelligence. I wanted a digital employee that could read my research, organize my thoughts, and actually remember things.
I spent weeks researching the exact bottlenecks of running edge AI. I tested the hardware limits, verified the software overhead, and built a system that doesn’t just answer questions—it compiles knowledge.
Andrej Karpathy called it the LLM Wiki. And I built it entirely locally, completely private, using a cluster of two Raspberry Pi 4Bs.
If you want to stop renting a forgetful brain in the cloud and start building a permanent codebase for your mind, here is my exact step-by-step blueprint.
The Paradigm Shift: Why Standard AI is Broken
Most local AI setups use RAG (Retrieval-Augmented Generation). RAG pulls a few paragraphs from your files, tries to answer your question, and throws the work away. It’s terrible at synthesizing complex, multi-document ideas.
The LLM Wiki approach flips this. Instead of retrieving data at query time, the AI acts as a 24/7 librarian. When I drop a raw document into a folder, the AI reads it, extracts the entities, and compiles that knowledge into a highly organized, interlinked directory of Markdown files.
The system is divided into three strict layers:
- Raw Sources (My Job): A folder of immutable PDFs, transcripts, and web clippings. I drop files here. The AI is forbidden from editing them; they are the ground truth.
- The Wiki (The AI’s Job): A highly organized folder of Markdown files (
.md). The AI generates summaries, concept pages, and entity profiles, linking them all together automatically. - The Schema (The Rules): A system instruction file (like
CLAUDE.md) that tells the AI exactly how to format pages, link concepts, and flag contradictions.
With this setup, the AI does the grunt work of bookkeeping. When I ask a question, it searches the highly organized Wiki, not the messy raw files. It gets smarter every single day.
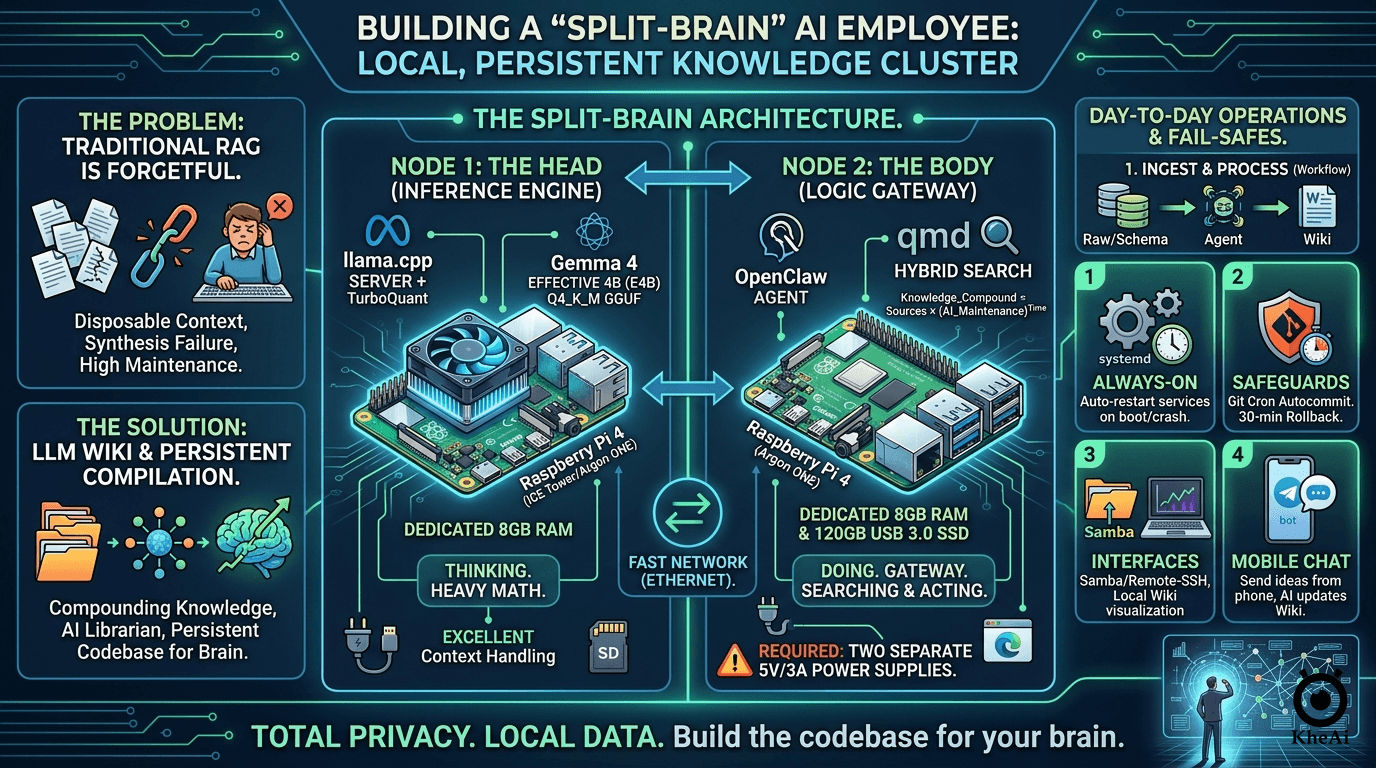
The Architecture: The “Split-Brain” Approach
Originally, I tried running this on a single Raspberry Pi. It worked, but it was a bottleneck. Browsing the web and running an AI model on the same 8GB of RAM is asking for system crashes.
So, I upgraded to a Split-Node Architecture. I separated the Thinking from the Doing.
Node 1: The Head (The Inference Engine)
- Hardware: Raspberry Pi 4B (8GB RAM) + High-Speed SD Card (16GB+).
- Role: Dedicated entirely to running the Large Language Model. It does the heavy math and nothing else.
Node 2: The Body (The Logic Gateway)
- Hardware: Raspberry Pi 4B (8GB RAM) + 120GB USB 3.0 SSD.
- Role: Runs the agent framework, manages the file system, searches the web, and hosts the actual Markdown Wiki.
The Golden Hardware Rules (Do Not Skip These):
- Two Power Supplies: You must have two high-quality 5V/3A power supplies. You cannot split power between two Pis running AI loads; they will brownout and crash.
- Active Cooling: Both Pis need ICE Tower or Argon ONE cases. AI inference spikes temperatures to 80°C in seconds. Heat equals thermal throttling.
- Hardwire the Connection: Connect the two Pis directly via an Ethernet switch. Wi-Fi adds latency to every single “thought.”
The Software Stack
To make this run efficiently on edge hardware, I had to be ruthless about resource management.
- The Operating System: Raspberry Pi OS Lite (64-bit). No desktop, no GUI. A desktop wastes nearly 1GB of RAM. We need that RAM for the AI.
- The Brain:
llama.cpp+ TurboQuant. Running on Node 1, this acts as the server. To run the AI, I usellama.cppconfigured as a local server. I paired this with TurboQuant optimizations, which allows complex models to run smoothly on ARM chips by compressing the context memory (the KV cache). - The Model: Gemma 4 Effective 4B (E4B). I use Google’s
Gemma 4 E2B Q4_K_M.gguf. It is a highly optimized, 2-billion parameter model perfectly tuned for function calling and logic tasks. It is smart enough to understand my Schema, but lightweight enough to output a reliable 2-5 tokens per second on the Pi 4B. Because Node 1 has a dedicated 8GB of RAM, we can upgrade from a 2B to a 4B parameter model. It’s significantly smarter, deeply logical, and handles large context windows beautifully. - The Hands: OpenClaw. Managing the file system and executing the “Lint” and “Ingest” passes. Running on Node 2, this agent framework watches my folders, reads my files, and navigates the web headlessly (Playwright/Puppeteer).
- The Memory:
qmd(Query Markup Documents). This is a local Hybrid Search engine. It uses Hybrid Search (BM25 for keywords + Vector for concepts). It lets Node 2 instantly find the exact paragraph it needs across hundreds of Markdown files in milliseconds.
Step-by-Step Implementation Guide
Here is exactly how I deployed my employee.
Step 1: Initialize “The Head” (Node 1)
-
Flash RPi OS Lite to your SD card and boot the Pi.
-
Install
llama.cppand configure it to use TurboQuant for context compression. -
Download the
Gemma 4 E4B Q4_K_M.ggufmodel. -
Run the server and expose it to your local network by using the
--host 0.0.0.0flag.Node 1 is now awake and listening for commands.
Step 2: Initialize “The Body” (Node 2)
- Flash RPi OS Lite to your 120GB SSD and configure the Pi to boot from USB. Do not put your Wiki on an SD card; the constant read/write cycles will destroy it.
- Install OpenClaw and configure its API target to point to Node 1’s local IP address.
- Install
qmdso OpenClaw can instantly search your files. - Set up the Three Layers of Truth directory structure:
/raw: Where I drop immutable PDFs and transcripts./wiki: Where OpenClaw writes the interlinked.mdfiles.SCHEMA.md: My strict rulebook telling OpenClaw how to format pages and flag contradictions.
Step 3: Establish the Fail-Safes
A digital employee is useless if it sleeps. I implemented three critical safeguards:
- systemd Services: I wrote Linux service files for both
llama.cppand OpenClaw. If the power drops, the Pi reboots, and the AI clocks back into work automatically. - Git Autocommit: I initialized the
/wikifolder as a Git repository. A background cron job commits changes every 30 minutes. If the AI hallucinates and ruins a file, I can instantly rewind time. - Samba & VS Code Remote-SSH: I don’t code on the Pi. I mapped the SSD as a network drive so I can view my growing brain beautifully visualized in Obsidian on my main laptop. Don’t use a heavy sync tool like Dropbox on the Pi.
Step 4: The Interface
I linked OpenClaw to a private Telegram bot. Now, I can text my AI employee an idea from my phone while I’m out getting coffee. It will independently research it, synthesize it with my past notes, and update my local Wiki by the time I get home.
How They Combine: The “Smart Librarian” Setup
In Karpathy’s analogy, the LLM Wiki is the Codebase, and the agent is the Programmer. OpenClaw can step into the “Programmer” role.
- OpenClaw as the Ingest Engine: You can give OpenClaw a “Skill” that monitors your downloads folder. Every time you save a PDF, OpenClaw detects it (Action), reads it, and then follows your LLM Wiki Schema to update your knowledge base (Compilation).
- The “Skill-Wiki” Hybrid: You can teach OpenClaw new skills by simply adding them to your Wiki. For example, if your Wiki has a page on “How I format my travel itineraries,” OpenClaw can read that page to understand how to perform a task for you in the future.
- Persistent Memory: OpenClaw’s standard memory is often “chat-based” or “snippet-based.” By forcing OpenClaw to write its findings into an LLM Wiki format, you give it a “long-term memory” that is human-readable and doesn’t disappear when you clear the chat history.
🚀 The Final Result
Building this required a healthy dose of skepticism, a lot of terminal debugging, and a refusal to accept the limitations of standard RAG.
But the result is profound. I no longer worry about forgetting what I read. I don’t waste time cross-referencing folders. I just curate high-quality raw material, define the rules, and let my 2-node AI cluster handle the bookkeeping.
Stop chatting with your files. Grab the hardware, split the load, and start building the codebase for your brain.