The GheiaGrid Playbook: Wiring Auth0, Snowflake, and Solana for the DEV Earth Day Challenge
In my previous post, I introduced GheiaGrid—a decentralized infrastructure concept that transforms urban balconies into “Autonomous Carbon Sinks.”
Today, I want to take you behind the scenes of my submission for the DEV Weekend Challenge (Earth Day Edition). I am going to show you exactly how I went from ideation to a fully deployed application using an entirely free AI stack. We will break down how I vibe-coded the core app, built a Zero-Trust M2M network with Auth0, set up an adaptable data lake with Snowflake, and created a Proof-of-Green economy on the Solana Devnet.
Grab a coffee. Let’s dive into the architecture that secures the win.
💡 The Strategy: How the Tech Stack Secures the Win
When looking at the hackathon judging criteria (Relevance, Creativity, Technical Execution, etc.), I realized that most participants would likely use one of the sponsored technologies as a wrapper. My strategy was to use a System-Level approach. To build a planetary-scale grid, we need security, scale, intelligence, and speed.
Here is how I mapped the stack to the project:
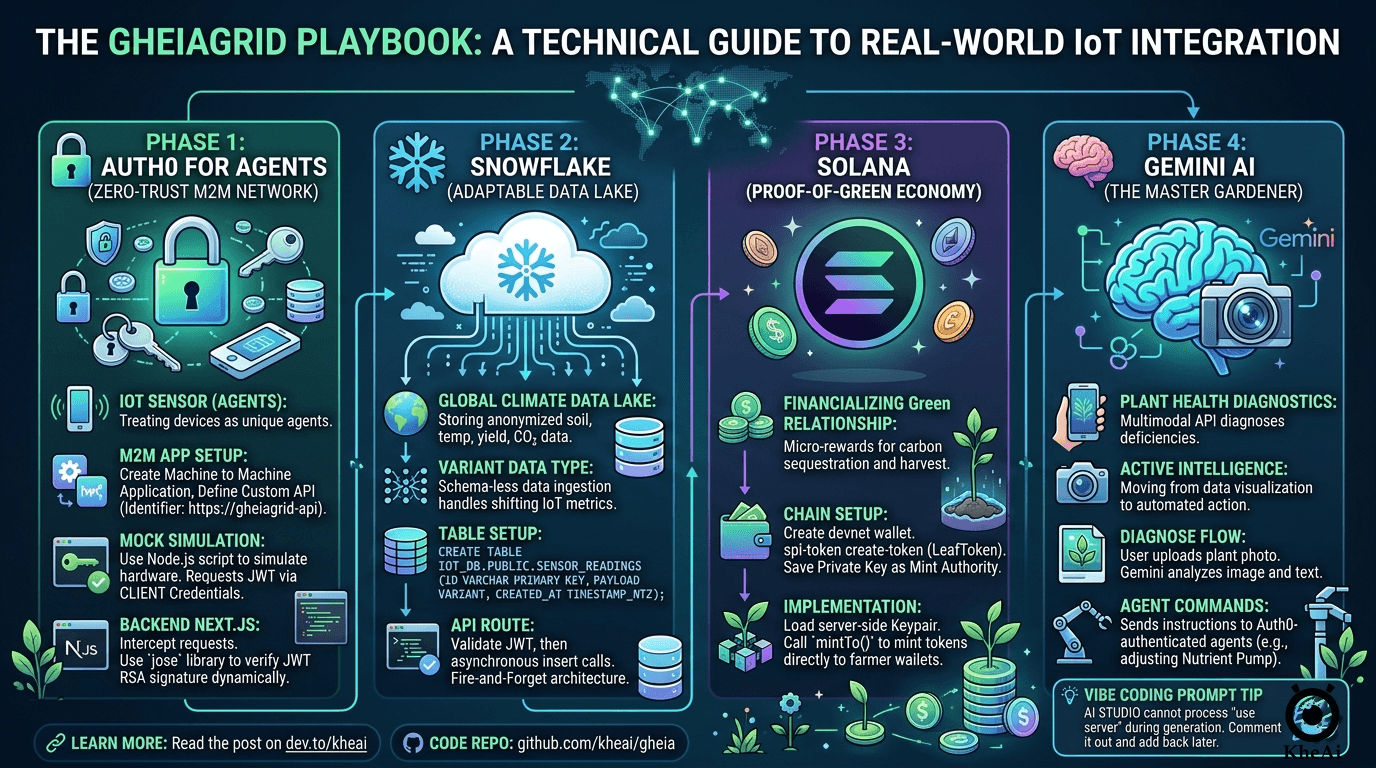
- Auth0 for Agents (The Identity of Things): In a decentralized farm, trust is everything. Instead of humans logging in, each IoT sensor is an “Agent” with its own non-human identity. This prevents spoofed data from farming rewards.
- Snowflake (The Global Climate Data Lake): Aggregating anonymized soil health and yield data into Snowflake allows us to map out the exact reduction of the urban heat island effect across thousands of nodes.
- Solana (The Proof-of-Green Economy): Solana’s low energy footprint perfectly aligns with Earth Day. Every time a node sequesters a specific level of CO₂ or records a harvest, it triggers a Devnet transaction, minting “LeafTokens.”
- Google Gemini (The “Master Gardener”): Moving beyond simple text chat, we use Gemini’s multimodal capabilities. Take a photo of a drooping leaf, and Gemini diagnoses the deficiency and sends a command to the Auth0-authenticated “Nutrient Pump Agent.”
- GitHub Copilot (The Execution Multiplier): Bridging Next.js, Auth0, Snowflake, and Solana is complex. Copilot acts as the glue to ensure the codebase remains strictly typed and well-built.
🤖 Vibe Coding the Foundation: The “God Prompt”
With the concept locked, I jumped into GitHub Copilot Workspace.
To get the absolute best results out of the AI, you need a highly structured prompt. Here is the exact “God Prompt” I used to scaffold the GheiaGrid Next.js app:
**ROLE & CONTEXT**
You are a Principal Full-Stack Engineer and IoT Systems Architect. We are building "The GaiaGrid," a decentralized, autonomous bio-economic grid for the DEV Weekend Challenge. The platform manages urban farming IoT sensors, uses AI for plant health diagnostics, stores climate data at scale, and rewards users with crypto micro-transactions for carbon sequestration.

**TECH STACK & ARCHITECTURE**
* **Framework:** Next.js (App Router), React, TypeScript.
* **Styling:** Tailwind CSS, shadcn/ui.
* **State & Data Fetching:** React Server Components (RSC) and Next.js Server Actions.
* **Integrations:** Auth0 (Machine-to-Machine / Agents), Solana Web3.js, Google Gemini API, Snowflake Node.js Driver, Backboard (for external admin UI routing).

**PROJECT DIRECTIVES**
1. Strict TypeScript: Enforce strict typing for all API responses, Solana payloads, and IoT telemetry.
2. Server Actions First: Keep heavy logic securely on the server side.
3. Modular Integrations: Create a dedicated `/lib` or `/services` directory (e.g., `solana.ts`, `gemini.ts`, `auth0-agent.ts`, `snowflake.ts`).
4. Mock Data for Hardware: Generate a robust mock data generator for sensor telemetry since physical IoT devices aren't connected yet.
5. Modern UI/UX: Build a clean, cyberpunk-meets-nature aesthetic using Tailwind.

**EXECUTION TASKS (Step-by-Step)**
**Step 1:** Scaffold the File Structure.
**Step 2:** Write boilerplate integration code for `/services` files (Auth0 M2M, Gemini Multimodal, Solana devnet minting, Snowflake batch inserts).
**Step 3:** Build the `app/page.tsx` dashboard (Global Carbon summary, Node grid, Gemini upload button, Solana feed).

**CONSTRAINTS**
Give me production-ready, highly commented code. Prioritize the `services/` directory and Dashboard UI.
(Pro-Tip for AI Studio: It cannot process "use server"; directives during generation. Just comment them out in your prompt, and add them back when you move to your local deployment).
🔒 Phase 1: Auth0 for Agents (M2M Zero-Trust Network)
Machine-to-Machine (M2M) uses the Client Credentials Grant. Your IoT sensors won’t “log in” via a browser; they exchange a secret for an access token.
External Setup
- In the Auth0 Dashboard, go to Applications > Create a Machine to Machine Application.
- Go to APIs > Create a custom API (Identifier:
https://gheiagrid-api). - Authorize your M2M app to request tokens for this API (enforce the
write:sensor_datascope). - Retrieve your credentials and add them to your local
.env:
AUTH0_DOMAIN="dev-pkdvnuvxf4ughty5.us.auth0.com"
AUTH0_AUDIENCE="https://gheiagrid-api"
AUTH0_CLIENT_ID="XXXXXXX"
AUTH0_CLIENT_SECRET="XXXXXXX"
Simulating IoT Hardware Locally
No physical hardware is required to test this! As far as Auth0 and your Next.js server are concerned, a Python or Node.js script running on your laptop looks exactly the same as C++ on an Arduino.
I created a script (scripts/mock-sensor.mjs) to act as my local device. It hits https://YOUR_DOMAIN.auth0.com/oauth/token to get a JWT, then makes a POST request to my local Next.js server (http://localhost:3000/api/telemetry) with the header Authorization: Bearer <THE_JWT>.
The Next.js Zero-Trust Implementation
Phase 1 is now 100% complete and fully secured:
- Cryptographic Validation: I installed the
joselibrary (ideal for Next.js Edge). The API route securely downloads the Auth0 tenant’s Public Key (jwks.json) and dynamically verifies the RSA signature of the incoming token. - Zero-Trust Hardening: We don’t just check if the device is verified, but what it is allowed to do. The endpoint extracts the token payload and strictly looks for the
write:sensor_datascope. If it’s missing, it bounces the request with a403 Forbidden. - The Proof: We wired the mock sensor data straight through to
NodeGrid.tsxvia an in-memory queue, proving external data is penetrating the security layer and updating the DOM!
❄️ Phase 2: Snowflake (Data Lake Telemetry Handler)
In-memory queues drop data when the server restarts. To handle real streams, we need to connect the official Snowflake driver (npm install snowflake-sdk).
External Setup
- Your default Virtual Warehouse is
COMPUTE_WH. - You can create a brand new one in the UI by going to Catalog > Databases > + Database and naming it something like
IOT_DB. Your default Schema isPUBLIC. - Crucial Step: Execute this SQL to create the table structure
CREATE DATABASE IF NOT EXISTS IOT_DB;
USE DATABASE IOT_DB;
CREATE SCHEMA IF NOT EXISTS PUBLIC;

CREATE TABLE IF NOT EXISTS SENSOR_READINGS (
    ID VARCHAR PRIMARY KEY,
    NODE_ID VARCHAR,
    PAYLOAD VARIANT,
    CREATED_AT TIMESTAMP_NTZ
);
Optional: Generate an RSA Keypair for secure authentication (better than passwords for programmatic access) and assign it to a service account user.
The VARIANT Magic
Relational databases get brittle with shifting IoT metrics. If I add a wind speed sensor tomorrow, it could crash a strict SQL table. By using Snowflake’s native PARSE_JSON() function, I take the entire incoming sensor metric object and store it as a raw VARIANT data type. It is essentially schema-less ingestion with the power of SQL analytics!
Add your credentials to .env:
SNOWFLAKE_ACCOUNT="BUHLYOL-XXXXX"
SNOWFLAKE_USERNAME="KHEAI"
SNOWFLAKE_PASSWORD="XXXXXXXX"
SNOWFLAKE_WAREHOUSE="COMPUTE_WH"
SNOWFLAKE_DATABASE="IOT_DB"
SNOWFLAKE_SCHEMA="PUBLIC"
Fire-and-Forget Architecture
Inside /api/sensor/route.ts, the code validates Auth0, but passes the Snowflake ingest call off asynchronously using .catch(). The API does not wait for the database query to complete. It instantly returns a 201 to the IoT hardware to save device battery power.
Now, when triggering my mock-sensor, my terminal lights up with:
"[Snowflake] Successfully archived reading for urban-farm-node-42 into data lake."Go back to Snowflake SQL. This query selects all columns and all rows from the SENSOR_READINGS table in the IOT_DB database, PUBLIC schema. It’s a full table scan — no filters, no limits.
SELECT * FROM IOT_DB.PUBLIC.SENSOR_READINGS;🟣 Phase 3: Solana (Devnet Blockchain Accounting)
To mint real SPL Tokens on the Devnet for our “Proof-of-Green” economy, we need to interact with the chain using @solana/web3.js and @solana/spl-token.
External Setup
- Install the Solana CLI and run
solana config set --url devnet. - Create a developer wallet (
solana-keygen new) and fund it (solana airdrop 2). - Create the SPL Token:
spl-token create-token. Save the Token Mint Address. - Save your wallet’s
id.jsonprivate key (this wallet holds the “Mint Authority”).
Code Implementation
Run npm install @solana/web3.js and npm install -D @types/bs58.
Inside services/solana.ts, we instantiate a Connection to https://api.devnet.solana.com. We load the server-side Keypair, and use the mintTo function to securely mint LeafTokens directly to the user’s wallet whenever the Snowflake data lake registers a specific carbon sequestration threshold.
🧠 Phase 4: Gemini AI (The Master Gardener)
We initialized the Gemini client securely in our services/gemini.ts file to act as the brains of the operation:
// Initialize the Gemini client securely.
// Uses GEMINI_API_KEY for standard deployments, falling back to NEXT_PUBLIC_GEMINI_API_KEY.
const apiKey = process.env.GEMINI_API_KEY || process.env.NEXT_PUBLIC_GEMINI_API_KEY;
const ai = new GoogleGenAI({ apiKey });
With the multimodal API, users can snap a photo of their GheiaGrid node, and Gemini instantly diagnoses plant health, creating a true feedback loop between the hardware sensors and the biological reality.
🚀 Deployment & Submission
Once the Vibe Coder generated the working code, I downloaded it, stripped out the AI Studio wordings, removed the old .git directory, and ran npm install.
After testing locally (npm run dev), I prepared it for Docker and pushed it to GitHub. Google Cloud Run handles the CI/CD pipeline seamlessly.
- Live Demo: https://gheia-750841821481.us-central1.run.app/
- GitHub Repo: https://github.com/kheai/gheia
- Video Demo: Watch on YouTube
Building this was an incredible sprint. If you are participating in the DEV challenges, leverage the AI tools available, build holistic systems, and don’t be afraid to wire up enterprise tech like Auth0 and Snowflake!